Sunday 26 May 2013

Sketch

Sheila's choice of theme this week, she designed a sketch for us all to follow.

 Sketch


Sheila's card


I started with a 6x6 card after using one of my dies to cut a border I used some brown ink to show off the embossed detail. I then used a flower die and cut some flowers in teh same pink card and again inked the embossing. The verse I used is a stamp which I stamped onto white card then used another die to cut the circle and inked the edges before removing the die. I placed the verse onto a brown scalloped die shape, I then added the flowers and leaves for embellishments and used some card candy and gems to finish.

Kathy's card


Starting with a 6 x 6 white base card, the first matt is from striped paper from my stash, l then die cut a border from plain purple card, and added a strip of spotted paper for faux ribbon effect. The main image was coloured with both Promarkers and Spectrum Noirs, and l decoupaged the hat. I then die cut both the main image and the text, matt onto spotted paper, inking the edges with Shaded Lilac distressed ink. To finish off I punched out flowers both in plain and spotted paper and layered onto each other, placed them onto a matt silver flourish.....card complete.
 
Kandis' card
 

This one is a 6x6 white base card followed by a sheet of green card.  I then embossed some white centura pearl card using one of the new 6x6 embossing folders from crafters companion - beautiful isn't?  The image is a stamp which came free with one of this months craft magazines but I am sorry I cannot remember which one, but I can tell you there were two lovely stamps.  I have coloured this one in using spectrum noirs and copics, die cut using spellbinders.  The flowers and leaves are all Marianne dies.  The sentiment is a die from Xcut.  All finished off with a couple of card candi and some gems.


Sunday 19 May 2013

Transport

Transport was Kathy's choice of theme.

Kathy's card


This card is an A5 Landscape, Blue Pearlescant, l embossed double lines to give a faux frame effect. The matt was made by sticking small pieces of tape in a patchy effect all over the piece of card, l then tinted it with Black Soot distressed ink, and also the edges- made tyre tracks in different angles- matted it onto silver mirror card. Finished off by placing the decoupage half and half over this matt. An ideal card for a enthusiast.
Sheila's card

My card is and A5 which is firstly layered with a stripe paper I found in my stash. I used black card for my first matt, and white card for my second. After stamping my image I used a circle die around my image to give the impression the car is coming out of the circle. I inked the edges of the 2nd layer and the circle to give more definition. I coloured my image and finished with a sentiment and card candi.

kandis' card

I always have difficulty doing men's cards.  This card is a DL card with some simple matting and layering of black card followed by some happy birthday backing paper from my crafty stash.
I then stamped the car is black versafine ink and embossed it with black embossing powder.  The car is a stamp from Tanda Stamps called Transport Set 1.  I die cut the car using spellbinders labels 23 and whilst it was still in the die I inked around he edges with black soot distress ink.  I then matted that onto some more black card.
The sentiment was stamped the same as the card, die cut with spellbinders ovals and matted onto some black card.  I have to apologise here because I cannot remember where the sentiment stamp was from
Quite a simple card but hopefully effective.  Thanks for looking at our blog and take care.
Chris' card

Transport is one of my favourite themes and I collect transport stamps. This card was made using a mixture of a new pictorial text stamp from IndigoBlu and an old stamp I've had many years (from PI I think). I've mixed them with a mono background which is another favourite and great for guys.

Saturday 11 May 2013

Anything feathered

Chris chose 'Anything feathered' for this weeks theme.

Chris' card


This is a 3D card with pleated sides. My most favourite topic is birds so this week really wasn't a challenge at all for me, lol. I've used Treasure Gold to colour the cage, birds and flowers.

 Kandis' card


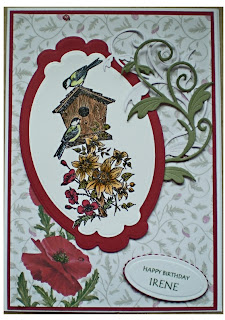
I started with a plain white C5 card, matted some red card and then some patterned paper which is from a Joanna Sheen CD but I am sorry I cannot remember which CD it is.  I then stamped my image which is Clematis/Cottage Precut Set from Heartfelt Creations onto watercolour card with black versafine ink and clear embossed it.  I then water coloured it in with whisper pens, die cut it out and layered it onto some red card which was faux die cut.
 
The swirls are from cheery lynn designs, one was die cut in green and another in white.  My sentiment was typed in word and then die cut out using an oval die cut.
 
This is a beautiful stamp and I hope you like
the card.  Take Care.
 
Kathy's card
 

The card is 6 x 6 and l started off with two toning papers from my stash, l floral and l striped, placing them half and half with a lemon ribbon around and also topped with a bow.  The image was stamped with black ink and clear embossed, coloured with my Promarkers. I then cut it out using my Spellbinders and matted it on Gold mirror card. Finished off with some lemon Card Candy.

Sheila's card


My card is A5 in size and layered with a leafy paper leaving a small border. I chose a peacock stamp for my image and used distress ink to stamp then stiple with a brush to make my topper. I inked the edges before matting onto white card and then layered this onto brown card. I then stamped the wording and layered in the same way as my topper. I placed ribbon across the bottom of my card added my topper and sentiment then finished off with gems.

Saturday 4 May 2013

Gilding Flakes

Kandis chose 'Gilding Flakes' for this weeks theme.

Kandys' card


Men's cards are always hard for me and I have a man's birthday coming up so decided to use gilding flakes. I had done a card last year so that was out so I remembered a set of stamps I had from creative expressions using indian images and that is where I got the indian chief from. Unfortunately I have cut the top off the picture card that came with it so can't remember exactly what it is called - sorry.

This is a very simple card, matting and layering in navy and gold. I have paper pierced around the edge of teh first navy mat in true Sue Wilson style. The guilding flakes I used on are Lancashire Rose from Indigo blu which is a very pretty set but is also suitable for this card. I also used teh gilding flakes for the name - those stamps are the alphabet set from Clarity Stamps - an extremely useful set of stamps that I have used a lot and were well worth getting.

Hope you like this one. Thanks for looking at our blog. Take care

Chris' card


I stamped a map and compass onto black card and used variegated gilding flakes instead of embossing powder as the medium for this part of my metallic tableau.

Kathy's card


For this weeks challenge using gilding flakes l have chosen to make a card suitable for either Anniversary or Wedding.  Starting off with an A5 landscape white card, matt and layered with silver, and some paper from my stash, and used silver corner peel-offs.  Using my new di-lite die "Vines of Passion" l used my Flitta Glu and added my silver gilding flakes, matt it onto plain white heart using the same die, and then cut another one in linen effect silver card. Using some white Organza ribbon, tied a bow adding a cross charm. I left the plain heart so as to add initials if required, as this will be added to my stock for my craft stall.

Sheila's card


My card is 6x6, my first layer is black card and slightly smaller. The embossed layer is smaller again, I cut and aperture using a nestie scallop circle. I used a Martha Stewart punch for the corners and an embosilicious embossing folder for the embossied design. Before I placed the embossed layer I used decorative acetate, once this layer was on my card I cut a small nestie circle and stamped my sentiment. My butterfly is a peeloff coloured black with a promarker, I placed it onto some clear sticky backed paper and put the gilding flakes onto the sticky part so can see through the design of the butterfly. I then cut this out and finished off with placing it onto my card.